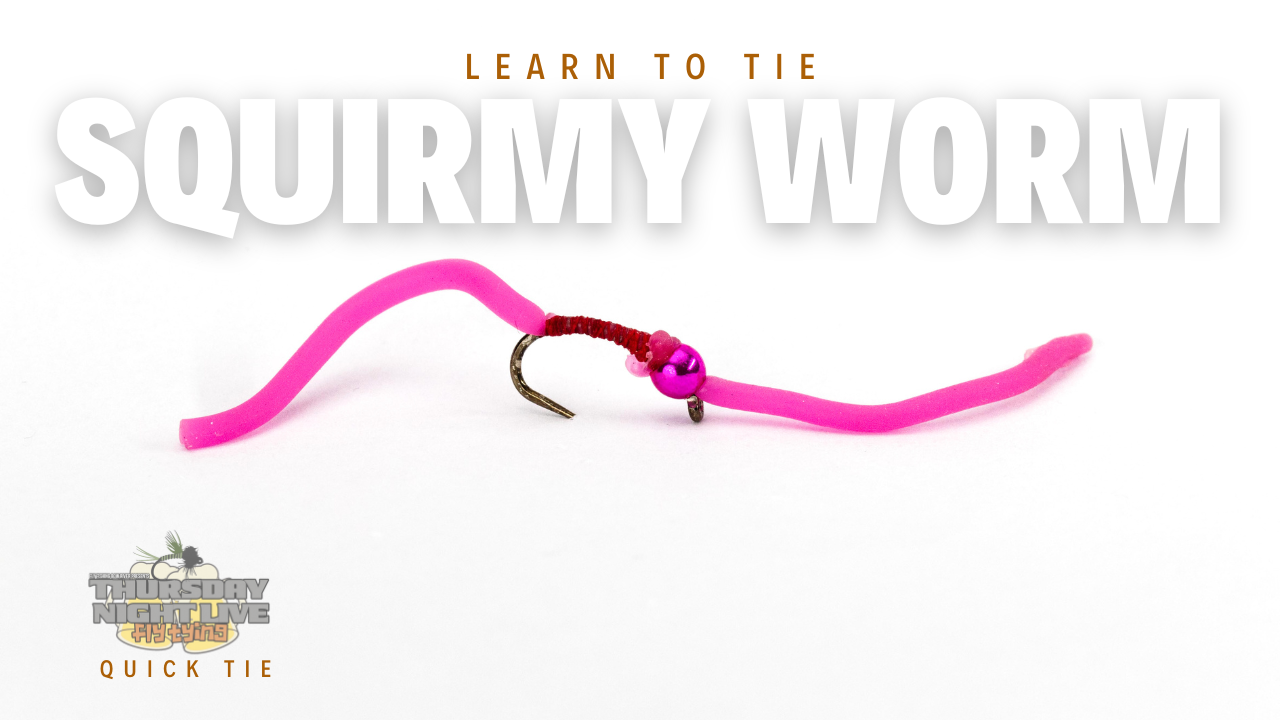
Mastering the Art of Tying the Squirmy Worm: A Fly Tying TutorialIntroductionWelcome to a captivating journey into the world of fly tying, brought to you by Tim from Thursday Night Live Fly Tying and Fly Fishing, sponsored by Fly Fishing Bow River Outfitters and Western Canada Fly Fishing Guide School. In this Season 6 kickoff episode, we delve into the intricacies of tying one of the most effective and simple flies for fishing – the "Squirmy Worm." This tutorial is designed to guide both novice and experienced anglers through the process of creating this unique fly. Gathering Your MaterialsThe beauty of the Squirmy Worm lies in its simplicity. The required materials are minimal, yet essential. You will need a well-curved hook, a small bead, the distinctive squirmy worm material – known for its flexible and rubbery texture – and thread for tying. While our expert Tim opts for UTC 140 in pink to match the worm's color, feel free to experiment with other colors like white or black, depending on your preference and fishing needs. Setting Up for SuccessThe first step involves positioning the bead onto the hook. This is done by threading the hook through the smaller end of the bead, aligning it perfectly with the eye of the hook. Secure this setup in your fly-tying vice, and you're ready for the next crucial phase. Mastering the Squirmy Worm MaterialHandling the squirmy worm material can be challenging due to its rubbery nature. Tim demonstrates a unique technique using a loop of heavier thread to efficiently pull the material through the bead. This ensures that it protrudes just the right amount from the hook's eye, which is key to the fly's design and functionality. Patience and delicacy are required here to avoid damaging the material. The Tying ProcessWith the material in place, the tying begins. Create a thread base along the hook, providing a surface for the squirmy worm material to grip. The wrapping technique is crucial; it involves creating segmented patterns along the hook, resembling a natural worm. Gentle, controlled thread wraps are essential to prevent twisting or overstretching the material. Finishing TouchesOnce you have achieved the desired length and segmentation, secure the material with tight thread wraps and trim the excess. A final whip finish at the back of the hook completes your Squirmy Worm. A crucial tip from Tim: avoid using any resin on the squirmy worm material, as it can cause deterioration. ConclusionTim concludes the tutorial by underscoring the Squirmy Worm's effectiveness in fishing, particularly during challenging conditions. This fly can be a game-changer, often turning a tough day into a successful one. Whether you're new to fly tying or looking to add to your repertoire, the Squirmy Worm is a must-try. Stay tuned for more insightful episodes from Thursday Night Live Fly Tying and embark on your fly-tying adventure with confidence. Happy tying, and see you on the water! 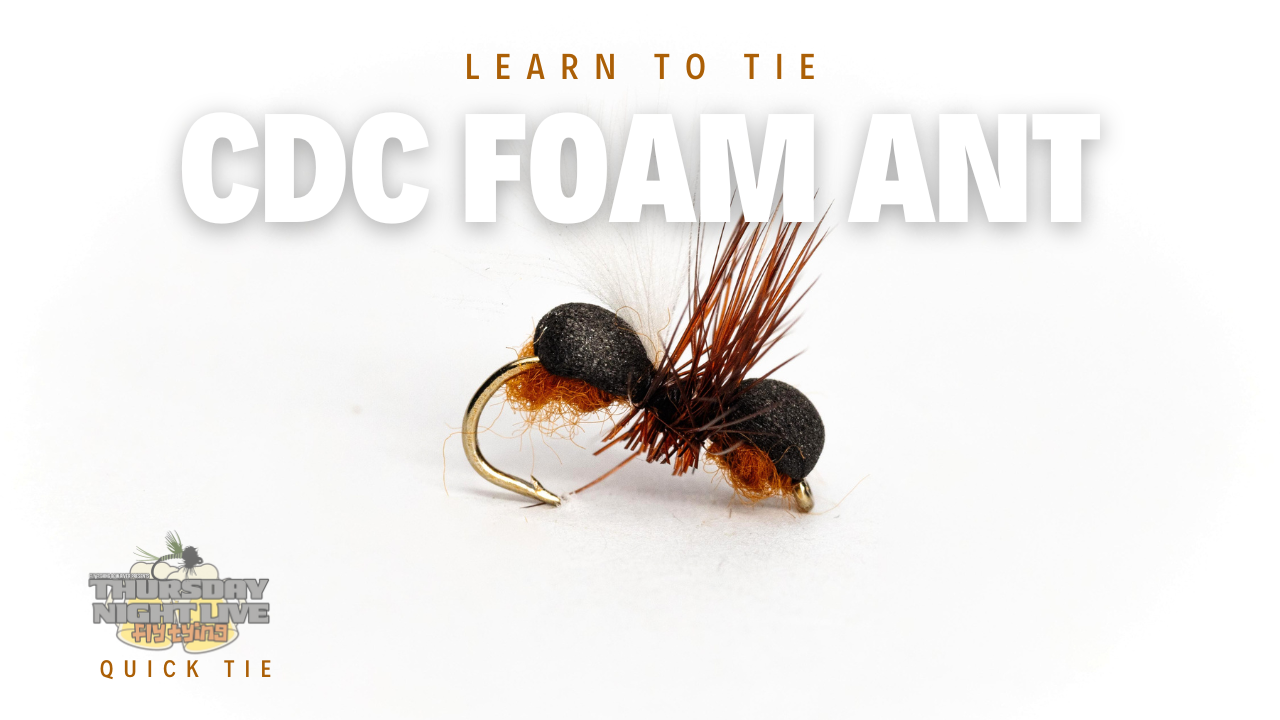 Tying a CDC Ant Fly Introduction Welcome to another quick fly tying session! In this article, we will guide you through the process of tying a CDC (Cul de Canard) Ant fly. This fly is a simple yet effective pattern that can be used to imitate ants on the water's surface. Whether you're a seasoned fly tyer or just getting started, this pattern is a great addition to your repertoire. Materials Before we dive into the tying process, let's take a look at the materials you'll need for this fly: - Hook: Size 14 hook - Thread: UTC 70 in golden brown - Foam: A strip of foam, cut to about an inch in length - Dubbing: A small amount of dubbing for the body - CDC Plume: A CDC feather for the wing - Hackle: A long strip of reddish-brown hackle Tying Steps 1. Securing the Foam Start by attaching your thread just behind the eye of the hook. Leave it hanging right around the barb area. Now, take the strip of foam, which you've cut to a smaller size, and trim a point at one end. Lay this pointed end on the near side of the hook and secure it with a couple of loose wraps. Make sure the foam is evenly distributed on both sides of the hook. 2. Creating the Body Move your thread back to the desired position for the body, which should be closer to the hook's eye. Take a pinch of dubbing and create a dubbing noodle on your thread. Wrap the dubbing to form a slightly bulky body, especially in the back portion of the fly. This will help create the ant's body shape. 3. Securing the Foam Again Now, fold the foam strip over the body you've created and secure it with a couple of wraps. Be cautious not to pull too tight as you might cut through the foam with the fine thread. Use open spiral wraps with intermittent pressure to trap the foam down to the hook's eye. Smooth out the area with additional wraps. 4. Creating the Head Move your thread to the front of the foam, where you want to create the head of the ant. Use about half the amount of dubbing as you did for the body and make a smaller dubbing noodle. Wrap it to form the head of the ant. 5. Adding CDC Plume Prepare a CDC plume by stroking the fibers forward to create a fluffy wing. Measure it to hang off the back of the fly, approximately the length of a hook gap. Secure the CDC plume in the middle of the hook with thread wraps. Trim the excess. 6. Adding Hackle Prepare the hackle by stripping off a few fibers from the butt end, exposing the stem. Tie in the hackle with the underside facing down the fly. Palmer the hackle forward to fill in the space between the body and the CDC wing. 7. Finishing Wrap your thread behind and in front of the hackle to secure it. Trim any stray hackle fibers. Trim the excess foam and create a small head with a whip finish. 8. Final Trimming Trim any remaining stray hackle fibers below the hook point. This ensures that the fly sits correctly on the water's surface. Conclusion Congratulations! You've successfully tied a CDC Ant fly. This pattern is versatile and can be effective in various fishing situations. Experiment with different sizes and colors to match the natural ants in your area. Happy fly tying, and may your next fishing adventure be a successful one! 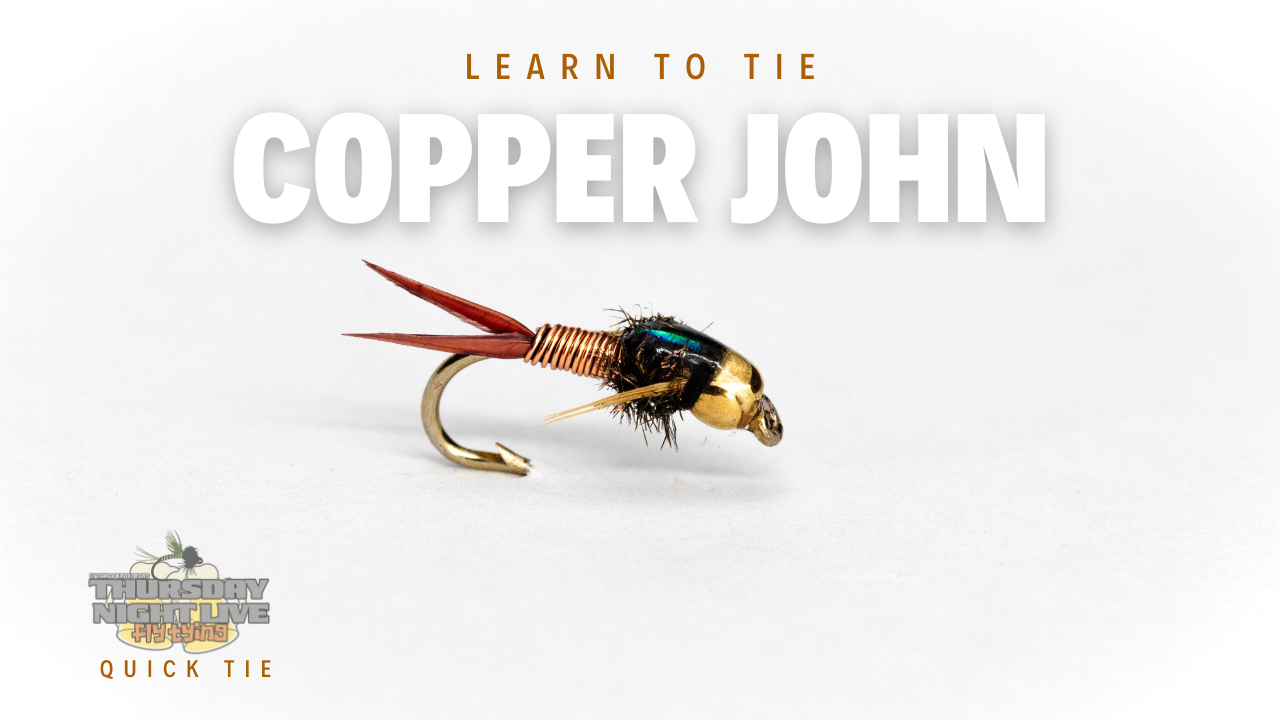
Tying the Copper John Fly: A Step-by-Step Guide Fly fishing enthusiasts, gather 'round! In this article, we will guide you through the process of tying the renowned Copper John fly, a classic pattern that has consistently proven its worth on the water. Whether you're a seasoned angler or a novice looking to expand your fly tying skills, we've got you covered. So, let's dive in and get those vise grips ready! Introduction to the Copper John Fly The Copper John is a small nymph fly that has stood the test of time in the world of fly fishing. This versatile pattern imitates various aquatic insects and is known for its ability to attract trout. In this tutorial, we'll walk you through the steps of tying a Copper John, complete with detailed instructions and tips. Materials and Equipment Before we start tying the fly, let's gather all the materials and tools you'll need: - **Hook**: You'll want to use a hook with a copper or bronze bead. The pattern typically calls for a size 14 hook, but you can adjust the size based on your preferences. - **Thread**: For this pattern, we recommend using UTC 70 thread in a bronze-brown color. - **Tail Material**: The tail of the Copper John is made of biots. You'll need two biots from your kit. - **Wire**: Copper wire is essential for wrapping the body of the fly. - **Flash Material**: Crystal Flash will provide some flashy highlights to attract fish. - **Nymph Back Material**: You can use Scud Back material, modified for this pattern. - **Peacock Herl**: Two pieces of peacock herl will help create the thorax of the fly. - **Legs**: Feathers from your kit will serve as the legs of the Copper John. - **Hackle Pliers**: These will be handy for handling the feather fibers. Tying the Copper John Now that we have everything ready, let's dive into the step-by-step process of tying the Copper John. Step 1: Preparing the Tail 1. Start by attaching your size 4 hook to the vise. 2. Use UTC 70 thread in a bronze-brown color. 3. Begin wrapping the thread just behind the eye of the hook, and trim any excess. 4. Move the thread back on top of the hook bend, stopping just short of the other side. Step 2: Tying in the Tail 1. Take two biots from your kit and ensure their points are facing upward. 2. Trim the butt ends of the biots to prevent tangling. 3. Arrange the biots to curve away from each other for a natural appearance. 4. Pinch the biots together and place them on top of the hook, measuring them to be about 3/4 of the hook shank. 5. Secure the biots in place with a few wraps of thread. Be gentle to avoid disrupting their position. Step 3: Building the Body 1. Wrap your thread forward, leaving space behind the bead for the thorax. 2. Now, take some of the biot material and wrap it up the hook shank. This will create an even underbody for the fly. 3. Continue wrapping until you have a space of about one bead length behind the bead. 4. Trim any excess biot material. Step 4: Wrapping the Copper Wire 1. Take the copper wire from your kit and secure it right behind the bead on the near side of the fly. 2. Wrap a couple of thread turns to secure the wire and then wrap it back toward the tail. 3. Be careful not to overwrap too far, as it might disturb the biots. 4. Ensure the wire reaches the edge of the hook bend. Step 5: Creating the Thorax 1. Leave the space you've cleared behind the bead to create the thorax. 2. Start by tying in two pieces of Crystal Flash right behind the bead. 3. Next, use the modified nymph back material to create the flashback. Tie it in right behind the bead as well. Step 6: Adding the Peacock Herl 1. Select two pieces of peacock herl and align their tips. 2. Tie in the herl right behind the bead and position it so that it forms the bulky thorax. 3. Palmer the peacock herl forward, wrapping it carefully to create bulk without overdoing it. 4. Secure the herl near the bead with a few wraps of thread. Step 7: Attaching the Legs 1. Prepare your feather fibers for the legs by pulling a few down from the tip. 2. Tie in these fibers on either side of the fly. Use hackle pliers to grab the very tip of the feather, expose it, and then trim it. 3. Position the legs to extend about two-thirds of the way down the body. 4. Secure the legs with a couple of wraps of thread. 5. Trim the excess feather material. Step 8: Finalizing the Fly 1. Pull the nymph back material forward, which will cause the legs to splay back and down the body. 2. Secure the material behind the bead with thread wraps. 3. Trim any excess material. 4. Add a touch of UV resin to create a glossy, durable finish on the thorax. 5. Cure the resin using a UV curing light. Conclusion Congratulations! You've successfully tied a Copper John fly—a timeless pattern that can be highly effective on the water. Feel free to experiment with different colors and sizes to match the hatch or the preferences of the trout you're targeting. Remember, practice makes perfect, so keep honing your fly tying skills, and soon you'll be creating beautiful flies that entice even the wariest of fish. Happy fishing! 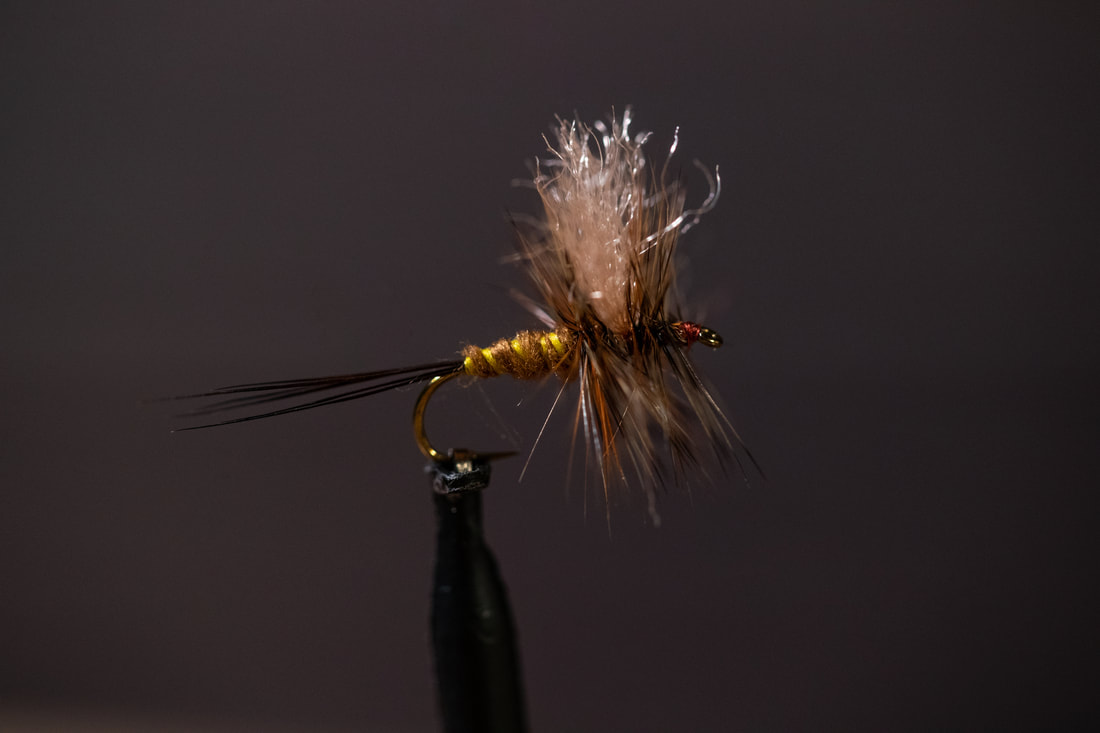
Fly tying is an art that requires precision and knowledge of materials, and one of the crucial aspects of this craft is selecting the right thread. Two common systems used to measure thread thickness are the Aught and Denier systems. Understanding these systems is key to choosing the right thread for your fly tying projects.
The Aught System The Aught system, denoted as "/0" (e.g., 6/0, 8/0), is a traditional method used primarily in fly tying. In this system, the higher the number before "/0", the thinner the thread. For example, 6/0 is thicker than 8/0. However, it's important to note that the Aught system is not standardized. The thickness for a given aught size can vary between manufacturers. This system is more about relative thickness and is deeply rooted in the tradition of fly tying. The Denier System On the other hand, the Denier system offers a more scientific approach. Denier measures the linear mass density of fibers and is defined as the mass in grams of 9,000 meters of thread. A higher denier means a thicker thread. This system is widely used in the textile industry and provides a consistent and quantitative measure of thread thickness. For instance, a 70-denier thread is thinner than a 210-denier thread. Comparing Aught and Denier To better understand how these systems correlate, let’s look at a chart comparing Aught sizes with Denier values: 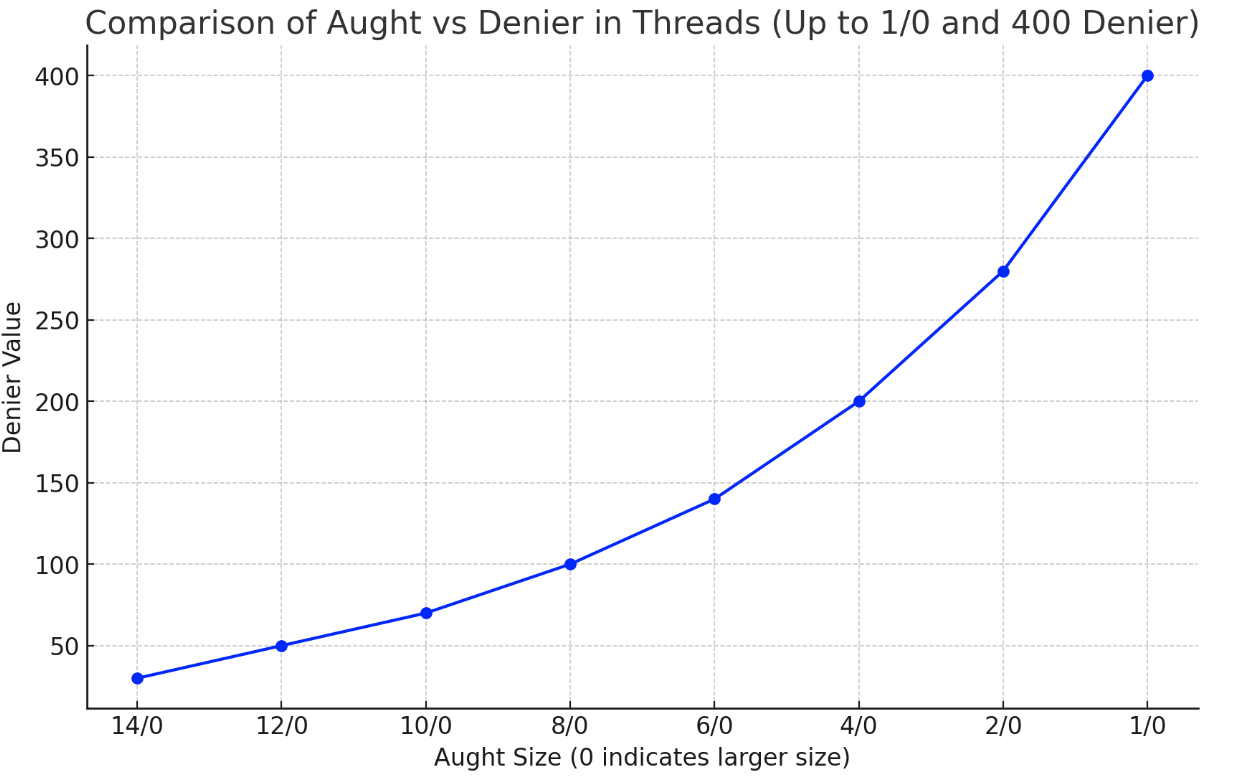
Aught vs Denier
As illustrated, the relationship between Aught size and Denier is inverse; as the Aught size decreases (toward 1/0), the Denier value increases, indicating a thicker thread. Why This Matters For fly tiers, selecting the correct thread size is crucial for the type of fly being tied. Smaller flies require finer threads (higher aught number or lower denier), while larger flies need thicker threads (lower aught number or higher denier). The choice of thread affects not just the appearance but also the functionality of the fly. Conclusion Understanding the Aught and Denier systems is essential for fly tiers of all levels. While the Aught system remains popular due to its historical use in fly tying, the Denier system provides a more precise measurement. By familiarizing themselves with both systems, fly tiers  Etiquette on the Water: Cultivating Harmony in River Angling: The allure of fly fishing from a drift boat extends beyond the mere act of catching fish—it's about communing with nature, relishing the tranquility of the river, and sharing this experience with fellow anglers. Central to this harmonious pursuit is the observance of etiquette on the water, a code that fosters respect, consideration, and camaraderie among all river enthusiasts. Respect for Space: At the heart of river etiquette lies the principle of respecting each other's space. When navigating the waters in a drift boat, it's essential to maintain a respectable distance from other anglers. Avoid encroaching on their fishing spots, allowing them the freedom to cast their lines without feeling crowded or disrupted. Mindful Maneuvering: The art of rowing a drift boat isn't just about navigating the currents; it's about doing so thoughtfully. Be aware of other boats and anglers on the river, using controlled and considerate movements to navigate around them. A courteous gesture, such as signaling your intentions before passing or yielding the right of way, fosters a congenial atmosphere on the water. Environmental Stewardship: An integral facet of river etiquette is a deep reverence for the environment. Avoid littering or leaving any trace of your presence behind. Carefully handle fish and release them with care, ensuring their well-being and preserving the delicate balance of the river ecosystem. Assistance and Engagement: In the spirit of camaraderie, offer a helping hand when needed. Whether it's assisting a fellow angler with a snagged line or sharing insights about the river's currents, fostering a sense of community and mutual support enriches the fishing experience for everyone involved. Patience and Tolerance: The river is a shared space where anglers of varied skill levels and preferences converge. Exercise patience and tolerance, understanding that each individual has their approach to angling. Embrace this diversity, celebrating the shared passion for the sport while accommodating different fishing techniques and styles. Educating and Inspiring: Embrace the opportunity to educate and inspire. For newcomers to the sport or those unfamiliar with river etiquette, gently impart knowledge about respectful practices on the water. By setting a positive example and sharing insights, you contribute to a culture of responsible angling that extends far beyond your own boat. A Symphony of Respect and Camaraderie : In essence, etiquette on the water is the cornerstone of a harmonious angling experience. It's more than a set of rules; it's a symphony of respect, consideration, and camaraderie that orchestrates an atmosphere where every angler can revel in the serenity of the river while pursuing their passion for fly fishing. By adhering to these principles of etiquette, anglers contribute not only to their own enjoyment but also to the preservation of a shared treasure—the beauty and sanctity of our rivers.  Trailering and Launching: The Prelude to River SerenityPreparing to set sail on a river adventure with a drift boat is akin to orchestrating a symphony; every note must align harmoniously to ensure a smooth start. And it all begins with the meticulous act of trailering and launching your vessel.
Trailering: Securing Your Vessel Before embarking on your angling journey, securing the drift boat onto the trailer is the crucial overture. This involves a careful marriage of the boat and trailer, ensuring a snug and secure fit. Check and double-check the hitch, ensuring it's firmly latched, and the boat is firmly affixed to the trailer. Safety chains and trailer lights should be properly connected and operational for legal compliance and overall safety during transit. Pre-Launch Preparations Arriving at the river's edge heralds the next act in this symphony: the pre-launch preparations. Take a moment to survey the launch site, ensuring it's clear and accessible. Be mindful of others waiting to launch or retrieve their boats. The Launch: A Deliberate Ballet The actual launch of the drift boat requires a delicate choreography. Approach the water gradually, ensuring the boat is properly aligned with the launch ramp. Exercise patience and caution; rushing this process can lead to mishaps or unnecessary stress. A Smooth Descent As the boat gently glides into the water, maintain steady control. Guide it smoothly off the trailer, allowing it to float freely while ensuring it doesn't drift away or encounter any obstacles. This controlled descent sets the tone for the day's adventure, signaling the commencement of your river escapade. Final Checks Once afloat, perform a final check of the boat's equipment—oars, fishing gear, safety equipment—to ensure everything is in its rightful place. Double-check the trailer is properly parked and secure, ready to be retrieved when you return from your fishing expedition. Trailering and launching a drift boat is not merely a logistical endeavor; it's the prelude to a day of tranquility and excitement on the river. Attention to detail, patience, and a methodical approach ensure a seamless transition from land to water, setting the stage for an unforgettable fly fishing experience.  For many anglers, the thrill of fly fishing from a drift boat is unparalleled. The gentle sway of the river, the artful cast of a line, and the anticipation of a catch all culminate in an experience that's both serene and exhilarating. But mastering the art of rowing a drift boat is essential to ensure a seamless and enjoyable fishing expedition.
Beginning with Trailering and Launching Preparing for a day on the river begins with securing the drift boat onto a trailer. Properly hitching and ensuring the boat is securely attached is crucial for a safe journey. Always check local regulations for trailer speed limits and road rules. Arriving at the river, patience is key when launching the boat. Take your time and be mindful of others at the launch site. A smooth launch sets the tone for the day ahead. Etiquette on the Water Respect for other anglers, boaters, and the environment is fundamental. Avoid crowding other fishermen and maintain a safe distance on the water. Practicing good river etiquette contributes to a harmonious fishing experience for everyone. Anchoring and Rowing Tips ( YOUTUBE VIDEO ABOVE) A well-placed anchor is a fly fisherman's ally, allowing for precise positioning for optimal casting. Master the art of anchoring by understanding river currents and selecting suitable anchor points. When it comes to rowing, finesse and technique reign supreme. Start by getting accustomed to the oars' feel and response. Use shorter, controlled strokes to navigate through varying currents, and always keep an eye on the upcoming river features. Prioritizing River Safety Safety is non-negotiable when on the water. Equip yourself with a personal flotation device (PFD) and ensure all passengers have theirs on as well. Understanding river currents, potential hazards, and weather conditions is imperative for a safe outing. Navigating River HazardsFrom submerged rocks to swift currents, rivers present an array of hazards. Learn to read the water, identifying safe passages and potential obstacles. Stay vigilant, especially in changing conditions, to avoid mishaps. Safety Gear in the Boat Besides PFDs, carry essential safety gear such as a first aid kit, a throw bag, a whistle, and emergency supplies. These items can be invaluable in unforeseen circumstances and are indispensable for any responsible angler. Rowing for Fishing: A Skill to MasterThe art of rowing for fishing goes beyond maneuvering the boat; it's about enhancing the fishing experience. A skilled rower can position the boat optimally for the angler, accounting for wind, currents, and the best casting angles. Rowing a drift boat for fly fishing is a multifaceted skill that combines technical prowess with a deep appreciation for the natural environment. Mastering the nuances of rowing and understanding river dynamics ensure not only a successful fishing trip but also a safe and enjoyable one for all.  Capturing the Perfect Fly Fishing Moment: Photography Tips and Tricks
Hey there, fellow fly fishing enthusiasts! You know that magical feeling when you're out on the water, casting your line, and connecting with nature? Well, what if I told you that you could capture those moments forever through the lens of your camera? Yes, that's right! Let's talk about the art of fly fishing photography and how you can immortalize those incredible moments on film. 1.Gear Matters, But It's Not Everything You don't need the most expensive camera gear to take stunning fly fishing photos. Sure, a high-end DSLR or mirrorless camera can do wonders, but even your smartphone can capture some breathtaking shots. What truly matters is how you use the gear you have. 2.Lighting – Nature's Best Friend One of the secrets to amazing photography is good lighting. Early morning and late afternoon usually offer the best natural light for capturing the beauty of fly fishing. The soft, warm glow enhances the scene and adds a magical touch to your photos. 3. Capture the Action and Emotion Don't just focus on the fish! While that's often the goal, the emotions, concentration, and movements of the angler are equally captivating. Try to capture the anticipation in their eyes, the grace of their cast, and the thrill of the catch. 4.Experiment with Angles and Perspectives Get creative! Don't just shoot from eye level. Try different angles – get low to the water, climb up high, or shoot from unique vantage points. Changing perspectives can add depth and uniqueness to your photos. 5.Focus on Details Sometimes, the most beautiful moments lie in the smallest details. Capture the intricate patterns of the flies, the ripples on the water, or the worn-out fishing gear. These details often tell compelling stories. 6.Patience is Key Just like in fly fishing, patience is crucial in photography. Wait for the right moment, observe the surroundings, and be ready to click that shutter when the magic happens. Sometimes, the best shots come to those who wait. 7. Post-Processing Magic Editing can enhance your photos significantly. Whether it's adjusting exposure, contrast, or adding a slight vignette, simple edits can make your images pop. But remember, don't overdo it – subtlety is often the key to great editing. 8.Share Your Story Every photo has a story behind it. Share your experiences, the challenges you faced, the thrill of the catch, or the serenity of the surroundings. Let your audience connect with your journey through your images. So, there you have it – some tips and tricks to elevate your fly fishing photography game. Remember, the most important thing is to enjoy the moments you're capturing. So, grab your gear, head to your favorite fishing spot, and let your camera capture the magic of fly fishing! Happy clicking! 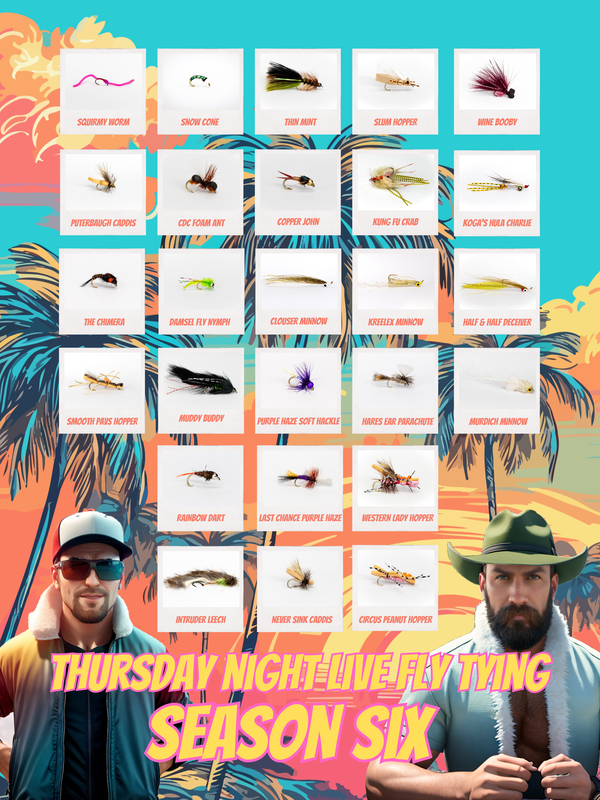 Embarking on the captivating journey of fly tying is a thrilling endeavour for any angler. Crafting your own flies adds a personalized touch to your fishing experience, and it all begins with assembling the right tools. Let's dive into the 10 indispensable items you need to start tying flies and explore their significance in creating the perfect fly.
1. **Vise: The Heart of Fly Tying** At the core of your fly tying setup lies the vise. This ingenious tool holds the hook firmly, allowing you to work your magic with precision. Invest in a quality vise that offers stability and adjustability to accommodate various hook sizes. 2. **Bobbin: Thread Control** The bobbin is your fly tying pen, controlling the thread with finesse. Opt for a bobbin with adjustable tension to maintain consistent wraps, ensuring the durability of your flies. 3. **Scissors: Cutting Edge Precision** A reliable pair of scissors is indispensable. Precision cuts are crucial for creating neat, effective flies. Look for scissors with a fine point to navigate intricate patterns with ease. 4. **Thread: The Invisible Bond** The thread is the invisible glue that holds your fly together. Choose threads in various colors and thicknesses, ensuring you have the right one for each pattern. A strong, durable thread is essential for securing materials in place. 5. **Hooks: The Foundation of Success** Selecting the right hook sets the foundation for a successful fly. Different styles and sizes cater to various fishing scenarios. Understanding the purpose of each hook type is key to tailoring your flies to specific situations. 6. **Dubbing: Adding Flare to Flies** Dubbing is the material that adds life and texture to your flies. With a vast array of colors and textures available, experimenting with dubbing allows you to create realistic imitations of aquatic insects. 7. **Hackle: Bringing Flies to Life** Hackle, often sourced from feathers, imparts lifelike movement to your flies. Whether dry flies or nymphs, the right hackle can mimic the motion of insects on the water's surface, making your flies irresistible to fish. 8. **Beads and Eyes: Adding Weight and Realism** Beads and eyes serve both functional and aesthetic purposes. They add weight to your fly, influencing its sink rate, while also enhancing its visual appeal. Experimenting with different sizes and colors can yield enticing results. 9. **Wire: Reinforcing Durability** Adding wire to your flies reinforces durability and adds weight. Wire can be used to create ribbing for nymphs or to secure materials in place. It's a versatile component that enhances the longevity of your creations. 10. **Whip Finish Tool: The Final Touch** The whip finish tool is the finishing touch to your masterpiece. It secures the thread, ensuring your fly remains intact during those vigorous battles with feisty fish. Mastering the whip finish is an art in itself, adding a professional touch to your creations. As this list can seem daunting, epsecially when you move into the material side of things, that is why we have designed fly tying kits to make this process super easy for you ! Can can choose sampler packs of individual patterns, or you can join us for a whole season of fly tying, to learn how to tie many patterns, without dishing out the big bucks on bulk material that you may never use! Click the button below to get started!  Fly fishing is an artful pursuit that offers anglers a unique connection with nature and a thrilling challenge. While various techniques are employed to catch different species of fish, dry fly fishing stands out as an elegant and exciting approach. In this blog post, we'll delve into the world of dry fly fishing, providing you with valuable tips and techniques to help you master this captivating aspect of the sport.
Understanding Dry Fly Fishing Dry fly fishing is a method where an artificial fly is presented on the water's surface to mimic a real insect. Unlike nymph or streamer fishing, dry fly fishing involves enticing fish that are actively feeding on the surface. To be successful, it's essential to understand the insects fish are targeting and to present your dry fly as a convincing meal. Tips for Selecting the Right Dry Fly
Dry fly fishing is a captivating and rewarding form of fly fishing, allowing anglers to witness fish rising to the surface and taking their fly. By understanding the insects, selecting the right dry fly, and mastering the presentation techniques, you can increase your success and enjoyment on the water. Remember that dry fly fishing is not just about catching fish but also about appreciating the beauty of nature and the thrill of the chase. So, grab your gear, practice your casting, and head to the water to master the art of dry fly fishing. With patience and persistence, you'll be well on your way to becoming a skilled surface angler. |
 RSS Feed